
One of my craft hobbies is to create highly detailed miniatures — often polymer clay sculptures, dioramas, and realistic miniature food, and sometimes handmade artisan keycaps for mechanical keyboards.
Over time, my creative process has been adjusted, expanded, and refined. The purpose of this blog post is to demonstrate an example of my process step-by-step, both to illustrate why the materials and effort begets the pricetag of one of these handmade, exclusive keycaps (often selling in a range of $60-80), and also why I love doing this and how my hobby has evolved into something that’s perhaps bigger than just a simple past-time.
What I Made
I documented the process of creating two artisan keycap sets with polymer clay, inspired by the giant insects called ohmu from Hayao Miyazaki’s animated film Nausicaä of the Valley of the Wind. One is a “Tranquil Ohmu: Toxic Jungle” and the other is an “Angry Ohmu: Wasteland” version.
If you’re unfamiliar with the inspiration source, I highly recommend the movie. As a bit of background, when the ohmu are calm, their multiple eyes glow blue; their primary habitat is the toxic jungle — full of enormous insects, poisonous plants, and white and blue-ish spores that cover the jungle floor like snow. When they are angry, the ohmu become enraged and their eyes glow red. They sometimes leave the jungle in this state and stampede across the desert wasteland.
The completed pieces are shown in the short videos below:
Sculpting the Ohmu
In the film I drew inspiration from, the ohmu are gigantic insects — tens of feet high — each huge, glowing eye an armspan wide. Of course, my interpreted renditions are tiny: only a little longer than my thumbnail.
I started with a mixture of Sculpey III gray polymer oven-bake clay and mixed it with brown, white, and black to achieve the shade I wanted.
Note: I don’t use Sculpey III for any particular reasons other than it’s what I originally started out with before I knew anything about the different types of oven-bake clays, and it’s abundantly available from online retailers.
To be brutally honest, after conditioning, it’s a bit too soft for most of the types of miniature sculpts I do. However, I have a significant stockpile of it now, so changing my primary material to Premo or Fimo would require a lot of additional investment that feels too wasteful when I have so much Sculpey III on hand.
I often leach the Sculpey III to remove some of the oil, add cornstarch to reduce stickiness, or put it in the freezer for a little while to make it easier to sculpt very tiny details. These techniques would likely not be as necessary with a firmer clay brand.
I sculpted six tiny ohmu. I often make polymer clay keycaps in extremely limited batches — but batches nonetheless. Very rarely do I only make one keycap (unless for commission), though I may focus on doing more one-offs in the future so I can keep my sanity and my spirits up by prioritizing my own mental health rather than for distribution or sale (to reduce the need to cater to the tastes of larger audiences).

After sculpting the bodies with a needle tool, very small ball tool, and pointed silicone tool, I baked them. Polymer clay is oil-based, so it does not cure (harden) until baked. I bake all my clay projects in a convection toaster oven on either a ceramic tile or parchment paper (depending on if the clay that touches the baking surface will be visible later), with tin foil tented over top. Clay baked on parchment paper will not become flat and shiny where it touched the hot surface; tile or metal will result in this.
Before baking, I used dark gray chalk pastel pigment (soft artist pastels shaved into dust with a razor and brushed on with a tiny, dry paintbrush) to add some shading to the carapaces. This was done around the bottom edge and where the carapace curves in before rounding out over the top.
Note: Shaved pastel pigment adheres well to raw clay and can be used to achieve a lot of really nice shading, coloring, and effects — but it does take some experience and practice to learn how to layer it without just making something look muddy, and to avoid leaving paintbrush marks. This is especially the case when using soft clay like Sculpey III. A few of my past, early pieces were sacrificed to the learning process with this technique.
After this initial round of shading, the ohmu were baked. Next I made minuscule blue (for tranquil) and red (for angry) eyes by mixing blue and red clays (respectively) with translucent clay. While the translucency is not strongly apparent in the photo below, it becomes more apparent once glaze and highlights are added (more on that later).
After the ohmu were cured and cooled down, I shaded them again, this time with Army Painter brand model wash in the color “Strong Tone.” Model wash is used for painting miniatures, and is an acrylic-based high-flow colorant that naturally runs into grooves and low spots on a model’s surface. It sets there and dries darker, creating depth and natural-looking shading without requiring the painter to manually apply tiny, tiny shadows with different colored paints.

Building the Bases
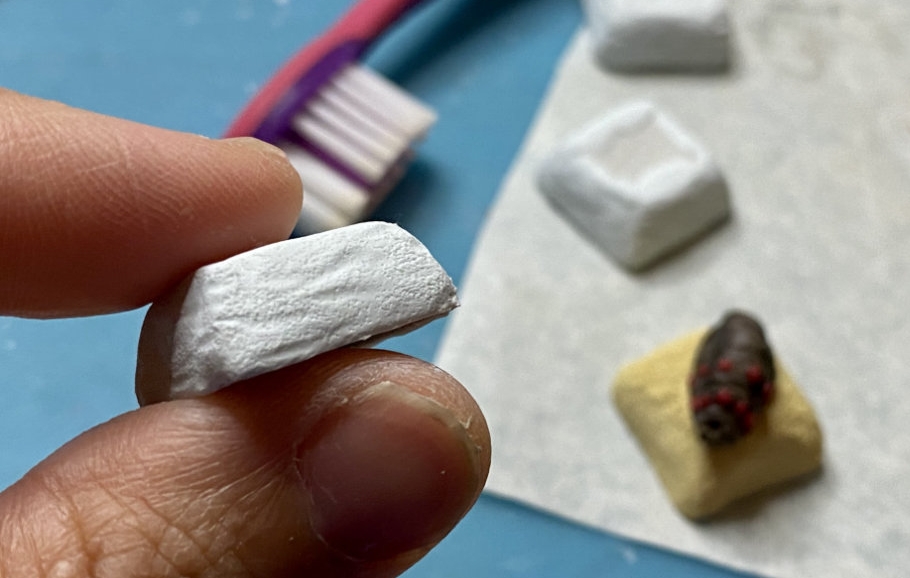
Next I did the keycap bases. I craft my polymer clay keycaps on PBT blanks (as a material, PBT plastic won’t melt in the oven at the baking temperature of polymer clay) in the DSA profile (because they are lower than other profiles and are uniform in shape). I buy unprinted keysets, but do need to do some work on the blanks before they’re ready for clay.
First I use an exacto knife to shave down the bottom edges and the lower sides. This is to accommodate keyboard clearance: if I layered clay (even a very thin layer of clay) on top of an unshaven keycap, it would not fit on a keyboard. It would hit the other keys and/or the case when pressed! This is a vital step that — if skipped — turns a keycap into just a tiny decoration. I also score all the faces of the keycap so that the clay will adhere to it better.
I then mixed colors to apply to the keycaps and coated the blanks. For the wasteland version, I simply covered the whole keycap with a sandy-colored clay mix.
However, for the toxic jungle, I coated the sides and top edges with a mixture of white, translucent, and just a tiny bit of blue for tint. (I’ll talk about the reasons for only coating the sides shortly.)


I talked about the importance of clearance above. After coating the keycaps, I turn them over and use an exacto blade to trim away as much excess clay as I can afford to without the keycap showing through (and occasionally, there are imperfections where the plastic does show; which is why I try to use a keycap color that won’t look too obvious underneath the clay base in case I mar the clay layer somehow during sculpting or handling).
Once the bases were coated, I used a toothbrush and a bristly brush tool to add layers of texture to the base clay. For the wasteland keycaps, I then scratched some small gouges into the surface and set the cured, shaded ohmu onto the keycaps, pressing firmly for good adherence.
For the toxic jungle versions, I also used the side of a conical silicone tool to add more texture to represent the accumulated poison spores (which are much like snow).
At this stage, the textured toxic jungle bases (which were only half covering the keycaps) were baked so they would already be cured before the next phase. This is important because I still had a lot of things to add to them, and I didn’t want to have to worry about smushing the layer of clay around the edges or leaving fingerprints on it (polymer clay is very susceptible to showing fingerprints!).
The wasteland versions were, at this stage, ready to be baked — so they went into the oven (complete with ohmu attached) along with the toxic jungle bases.
Completing the Toxic Jungle Base Sculpt
The toxic jungle keycaps had a few additional components: the toxic, spore-leaving plants. I made these from mixtures of blue / translucent / white clays and baked them separately in a batch before incorporating them into the main sculpt. Trying to add them while raw would have resulted in a frustrating mess of squished, unsalvageable blobs stuck in my base clay.
Note: As long as you do not exceed the recommended baking temperature in any individual curing session, polymer clay can ostensibly be baked an unlimited number of times without burning or compromising integrity.
In fact, the more it is baked, the harder it becomes. Multiple bakes are an absolute necessity for making very tiny, very detailed creations! Otherwise, you are likely to experience a lot of marred, squashed sculpts.

While the toxic plants were cooling from the oven, I added some more blobs of light blue and white + translucent clay to the tops to form mounds of accumulated spores. I then used a silicone tool to blend the raw clay with the baked clay around the edges of the keycaps. Once baked again, it would not be apparent that this was done in separately baked stages.

Because I wanted my toxic jungle and wasteland versions to be relatively uniform heights when on a keyboard next to each other, I needed to scrape out a furrow for my ohmu. I also wanted the spores to appear as a fluffy, deep layer so the ohmu shouldn’t be sitting right on top. (The added texture from gouging also provides better adhesion.)

Once the ohmu were firmly placed in the raw base clay, I used a toothbrush to texture the clay and finish blending it with the baked base layer.

The next step was adding the toxic plants. Very carefully, I stuck the hardened, cured plants into the raw clay. I was careful to place them close to the ohmu; close enough to be touching. Remember — these are keycaps for mechanical keyboards. Although most people don’t put irregularly shaped artisan keycaps on their most heavily used keys, they do end up getting pressed, often with regularity. If the spindly little plants were not close to the solid body of the ohmu, they would undoubtedly break off during use.

After the plants were in the clay, I wiggled them a bit to position them exactly how I wanted. This inevitably resulted in gaps around them. Of course, we can’t have that, so I used my trusty old child-size toothbrush again to both texture the clay and also push it firmly into place to support the plants. The stiff bristles of a toothbrush are very good for this type of thing. Using varying amounts of pressure, I also added more shape to the “spore terrain.”

The last plant spore is just a ball shape, which I did not need to pre-bake since using raw clay for this will turn out fine. I smooshed an indent into the remaining space with a ball tool, then placed a little ball of white + translucent clay into the indent and — finally — repeated the texturing with the toothbrush.

Finally ready to bake!

Shading Details
After baking, the keycaps transform from a sculpting project into a miniature painting project. I always use colored clays wherever possible, which improves the integrity of keycaps and prevents unideal colors showing through from wear / use, but to achieve the levels of detail I want, I often do two final passes to add a little more color.
I could have used chalk pastel pigment on the wasteland sand, but to be completely honest — I forgot! So I washed the bases with Light Tone model wash to provide shading and depth post-cure. When doing washes, I always use an inexpensive paintbrush. In this case, I used a flat brush from a cheap set of multipurpose paintbrushes. I bought several sets of these inexpensive brushes at once a while back for the purposes of washing and glazing (which tends to ruin brushes quite rapidly). And I buy more whenever the previous set starts to look like it’s on its last legs.

When working on keycaps with polymer clay, one of the biggest challenges is holding the darn thing. I have a Helping Hands tool, but honestly I hardly ever use it. It’s too clunky and stationary to easily turn keycaps and I spend more time trying to get it out of its own way when using it.
Instead, I use this MX switch keycap from Capsmiths. It’s a novelty keycap itself that is shaped like an MX Cherry keyboard switch, so other keycaps can be attached to it. It’s just the right size for me to closely and tightly hold my in-progress keycaps.
Note: I use this switch “holder” very sparingly when working with raw clay around the base because it takes a bit of force to remove keycaps from the switch. Many times (before I learned my lesson), I squished / marred my raw base clay layer when removing the keycap. Either that or the keycap would fly off all at once, bouncing across the table or worse: onto the floor!
Now I use this for painting post-cure, or to do detailing on the top of the keycap if the bottom edge around the base is already baked (such as in the case of the toxic jungle).

Whenever I use washes or paints, I put them in small paint pots. This way, I can ensure that I’m not wasting materials. Model paints and washes are not cheap. At the price per ounce, it’s a very sad thing to put them into disposable cups or palettes, and then have to discard the excess after a project. These little paint pots have been saving my wallet in a significant way!
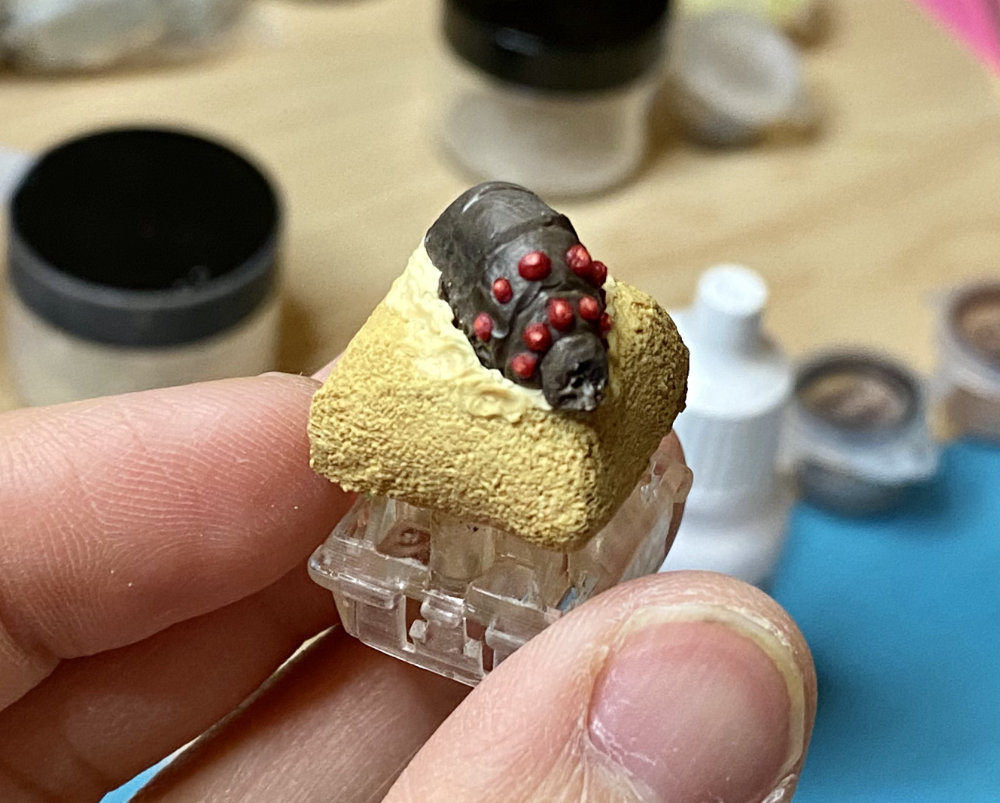
Note: You may notice that the wasteland keycap in some of these photos has an extra layer of lighter colored clay around the ohmu. This was something I experimented with: trying to create a dust cloud with translucent and sand-colored clays. However, I did not like how it turned out once baked. I consider this particular keycap to be a second because of this, and I did not add this effect to the other two wasteland caps.
However, it did come in really handy after all: I was able to use it as a trial run for other features (like highlighting the eyes) because I cared less if the results turned out imperfectly. This way, I was able to experiment a little bit without worrying that I’d ruin the whole batch.
One of the nice things about model paints is that they dry very quickly, so you can continue onto the next phase or layer pretty quickly.
Painting Details
At this point, the ohmu carapace and the bases looked close to being ready for varnish, but the eyes were lacking. I wanted to add some subtle highlights to enhance the semi-translucent color and add just a touch more depth.
Low quality brushes will not work well for these types of details. In a pinch, I have used a needle tip dipped in paint, but a cheap paintbrush at this stage will most often result in sadness and mistakes that cannot be easily corrected.
For eye highlights, I used Vallejo model paints (flat red mixed with a dab of white) mixed with a toothpick in a paint pot. I used a size 0 Winsor & Newton Series 7 Kolinsky sable brush, which was the perfect size.
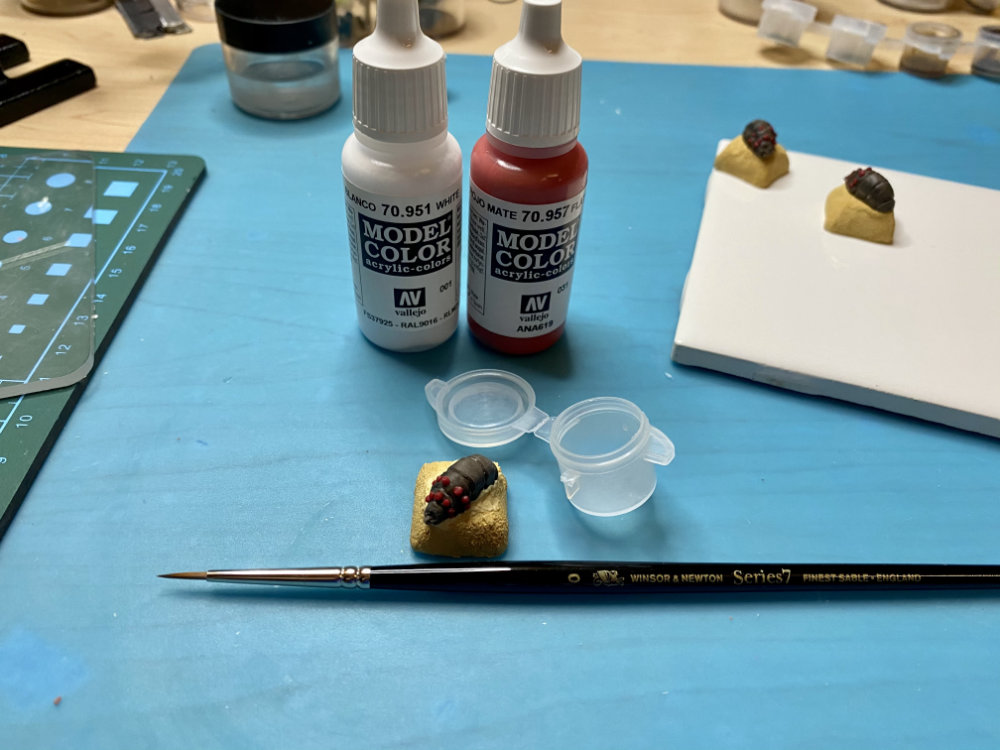

After successfully highlighting the wasteland set, I repeated the procedure with flat blue paint + white on the toxic jungle set.

Finishing Touches: Varnishing and Glazing
Varnishing / glazing polymer clay is so very important for a few reasons:
Firstly, to protect the keycap. Keys on a keyboard are used. Human fingers have natural oils on them, and the keycaps will experience these oils as well as small amounts of force and friction (even on low traffic keys like function or number keys).
Secondly, varnish and glaze add subtle effects that we might not even think about until we see something that’s been finished with just the right combination of effects to provide a level of detail or realism that’s very pleasing.
Matte Varnish
I usually triple-coat my keycaps, but that does not mean they’re piled with heavy, thick gunk on top. All three layers provide subtle detailing effects, especially when combined.
The first layer is usually Vallejo Mecha matte varnish. Matte varnishes reduce / eliminate glossiness (which isn’t important for this first coat, since the polymer clay I use bakes to a matte finish anyway). This first layer is primarily for protection.
Note: The Mecha Varnish is formulated for airbrushing, so it’s low viscosity (almost like water), but when used in thin layers, it works perfectly well with a normal paintbrush. (But do not let it pile up; it will create unappealing semi-translucent globs.)
Of course, as is consistent with my techniques for washes and paints, I use paint pots for varnishes and glazes to reduce waste of costly materials. Varnishes ruin paintbrushes pretty quickly, as does aggressive rinsing, so I use inexpensive brushes for this.

Satin Glaze
After the matte varnish coat over the entirety of each keycap in both sets, I used a Sculpey brand satin glaze.
Note: You could use any water-based satin glaze; I have had satin water-based polyurethane in my Amazon Saved For Later for a long time, meaning to get a more cost-effective backup material that will achieve the same thing for when my 1oz bottle of Sculpey glaze runs out.
Satin glaze is not as glossy as gloss glaze, but it’s still pretty darn shiny. I added a thin layer of satin glaze to the ohmu only (not the bases — sand and spores should not be even a little bit shiny, in my opinion).
The wide, flat brush actually creates a very narrow surface that I can slip between components and very carefully and precisely follow edges. And it’s not even an expensive brush so that makes me pretty happy.
The ohmu don’t have shiny or glossy carapaces in the inspiration content, but they are armored, and one thing that satin does is make surfaces look hard.

Shine Reduction Matte Varnish
Okay, but at this point the satin was still too glossy. The ohmu shouldn’t be shiny. Fortunately, matte varnish can take down glossiness without completely eliminating it, resulting in a really satisfactory and subtle effect. The trick is to apply the varnish lightly and selectively in a very thin layer.
I varnished all of the ohmu very lightly with matte varnish over the satin glaze; no need to be super careful since the base already is matte as well. I do want the eyes to be glossy, but we’ll get to that next, in the very last step.

Gloss Glaze
The very last step in the creation of this keycap series was to add gloss glaze to only the eyes of the ohmu. I used Sculpey gloss glaze and an inexpensive but pointier paintbrush — along with my trusty paint pots — to gloss every eye (each ohmu has twelve eyes, and there are six ohmu, so that was seventy-two eyes!).

Finishing Up
At this point, the construction of the keycaps was done but there was another step that is crucial that I glossed over earlier: and that is clearance testing.
Technically, clearance testing should be done as early as is feasible (without your raw clay sticking to anything, so probably after the first cure with clay around the base). But I forgot on these.
Note: There’s a way to clearance test early and it still works with raw clay if you happen to have something called a sculpting base. A sculpting base is a small platform for sculpting clay keycap masters for mold-making and resin-casting. Sculpting bases have a slightly raised platform and/or marks that indicate the industry specification for the safe area a keycap should stay within in order not to collide with other keys.
However, it’s a little harder to accurately measure with a sculpting base if you have elements that hang over the edges of the keycap, or a keycap that isn’t angled. Polymer clay also expands fractionally when baked (sculpting bases are often used with Monster Clay or wax, which do not expand.)
Especially with polymer clay over blanks, you should ultimately test on multiple real keyboards to see if your keycap will catch on other keys or on a keyboard case.
Fortunately, all of the ohmu keycaps passed clearance testing on multiple keyboards. ?


Thank You for Reading!
Phew! This was a long post, but thank you so much for reading. It feels good to document my process, and I hope to do more of these posts in the future — or maybe I’ll just set up a GoPro and record time-lapse videos of making keycaps (that seems easier).
Buy My Stuff — If You’d Like 🙂
I make and sell hand-crafted, one-of-a-kind artisan keycaps, both in raffle sales and on individual commission. (I also make realistic miniature food and tiny sculptures / collectibles / dioramas.)
If you’re interested in buying something, you can check out my shop, read about commissions and custom orders, or connect with me on Instagram to find out when giveaways, raffles, or fulfillment sales are held.