
As a miniature artist, I’ve always valued being able to produce repeatable results — particularly when the results are quite good. There are also times when I want to make many of the same thing, or variations of the same item. This is where making homemade molds has been incredibly useful!
There are several different techniques and ways to create and use molds with polymer clay. Read on to find out more.
How to Make Silicone Molds
It’s safe and straightforward to get started making silicone molds for polymer clay.
Make a Master Sculpt or Original Piece
The first step to making a mold is always to make a “master” sculpt. This is the thing you’d like to make copies of. Pay special attention to detail and produce high quality master sculpts. Anything you make in the mold later will be a copy of this one original sculpted item. You can take your time sculpting your master. Don’t worry about needing to reproduce or sculpt any more of the same thing by hand. That’s what the mold is for.
When I know I’m going to be making a mold, I make master sculpts out of modeling clay. This clay is specifically formulated for sculpting and holding details, like Super Sculpey Firm (shown below):

I don’t always make something with the intent to make a mold. Sometimes, I make an original item and then later want to make more. In this case, I cast one of the finished items into a mold. In these cases, the finished item is most likely not made from modeling clay but rather, colored polymer clay.
You can make a mold of pretty much anything. However, keep these things in mind when your intent is to use the molds with polymer clay:
One Element / Color Per Mold is Recommended
Molds for polymer clay are really meant to be used for one color of clay at a time. Think of them as components. You can make several molds of different components of different colors and then assemble the pieces later. Putting different colored clays into the same mold is not ideal when you’re making miniatures. (In this way, this is fairly different from the techniques used when making artisan keycap masters for resin casting.)
Design a Flat or Sculptable Surface
Your master sculpt needs an exit point in the mold, which should also have a large enough area that you can easily push raw clay into the mold and manipulate it using tools. Your master sculpt should therefore have a flat surface on it — or a surface that you don’t mind hand-sculpting each time you use your mold.
Mold-Making Materials
There are many different products for making silicone molds. Many mold-making silicones are two parts that can either be mixed by hand then harden in a short amount of time, or as a liquid that cures over several hours. Depending on how much time you want to spend (and your tolerance for error), you can choose from a few options. Here are my favorites.
Liquid Silicone Rubber
If you can afford to attach your master to a surface in a mold box or container, you can mix two-part liquid silicone rubber and pour it over your master, then let it cure several hours to overnight. This method is the most expensive (relatively speaking in terms of materials), the messiest, the most time-consuming, and the least forgiving. But when done correctly, it will produce the highest fidelity results. If you’re going this route, I recommend Smooth-On Mold Star 30.

While I always use liquid silicone rubber to make artisan keycap molds for resin-casting, I’ve personally found that I strongly prefer a different mold-making product when it comes to making molds for polymer clay.
Mold Putty
For clay molds, I have a strong preference for Amazing Mold Putty from Alumilite. This is a very easy-to-use two-part kit. Parts A and B are both putty solids. They don’t make a mess, are easy to scoop out by hand and weigh on a small kitchen scale, and simple and clean to mix with just your bare hands. There is no cleanup, and the mold cures in the air in only twenty minutes.

Because this is a putty, you do need to take extra care when pressing the master sculpt into the mold material, and make sure that there are no gaps or spaces trapped inside it. For my purposes, I will always choose Amazing Mold Putty first when making molds for polymer clay. There have been one or two times when I’ve found that the material is insufficient for my needs and have wound up using Mold Star secondarily, but this happens very, very rarely.
Using mold putty takes only a few steps and minimal equipment. You’ll just need a kitchen scale capable of weighing ounces / grams.
- Measure (weigh) equal parts A and B.
- Mix the two parts by hand by folding the putties together until the resulting mixture is uniform in color.
- Carefully press / squish the putty around your master sculpt, ensuring enough of the master is exposed to remove any copies you make.
- Let the mold cure for 20 minutes and remove the master.
- Press raw clay very tightly into the mold, using tools to make sure all mold spaces are completely filled.
- Either remove the raw clay to manipulate the base shape, or bake the mold with the clay in it to cure the clay. (See sections below for more details.)
Although you might think this material and method would produce lower quality molds, the level of detail and fidelity is still very high in very small scale when using Amazing Mold Putty (as you will see in the photos below).
Using Molds for Base Forms With Variation
Now let’s talk about the different uses for molds for polymer clay. One thing I like to do is use molds for creating basic forms, and then adding variation and details to the basic shapes while the clay is raw (before baking). Filling the mold with clay and then popping it out and using sculpting tools to manipulate the clay ensures that no two pieces are identical.
This is very useful for reproducing basic shapes (which is often the time-consuming, less-fun part of repeated sculpting). When you remove raw clay from a mold, you will always lose a little bit of fidelity when working with very small miniatures. But in this use case, that is exactly what we want to happen.


The molds in the photos above were used to create basic shapes and details and variations were added later. I was also able to make the master sculpts with easier-to-sculpt-with modeling clay, and could then reproduce copies in other colors using clay that is softer and less ideal for sculpting, but better for final outcome colors.


As you can see in the photo on the left above, removing the raw clay from the mold before baking / curing results in a loss of fidelity. However, I can then sculpt tiny details to add uniqueness to each piece.
Using Molds for Repeatable Details and Fidelity
Conversely, I also make molds specifically to preserve a high degree of detail and fidelity: to make precise, identical copies of my master sculpt.
In this case, I take extra care to ensure my mold putty is very tightly conformed to my master sculpt to produce a high quality, perfect mold. In the images below, I sculpted a tiny turtle and I want to make sure that every copy I make is as close to the original as possible.


One of the keys to recreating perfect copies is to make sure that the clay you fill the mold with fills every possible space inside the mold. Twist the clay into shape and then use small tools to squish it in very tightly, ensuring that it fills the mold completely.


Then bake your polymer clay with the mold — it’s silicone, so it won’t burn or melt during this stage! Just be careful touching it afterwards, as it will be very hot when it comes out of the oven.


Carefully remove your hard, cured clay from the mold and you will have perfect copies of your original master sculpt.
Using Molds for Batch Production
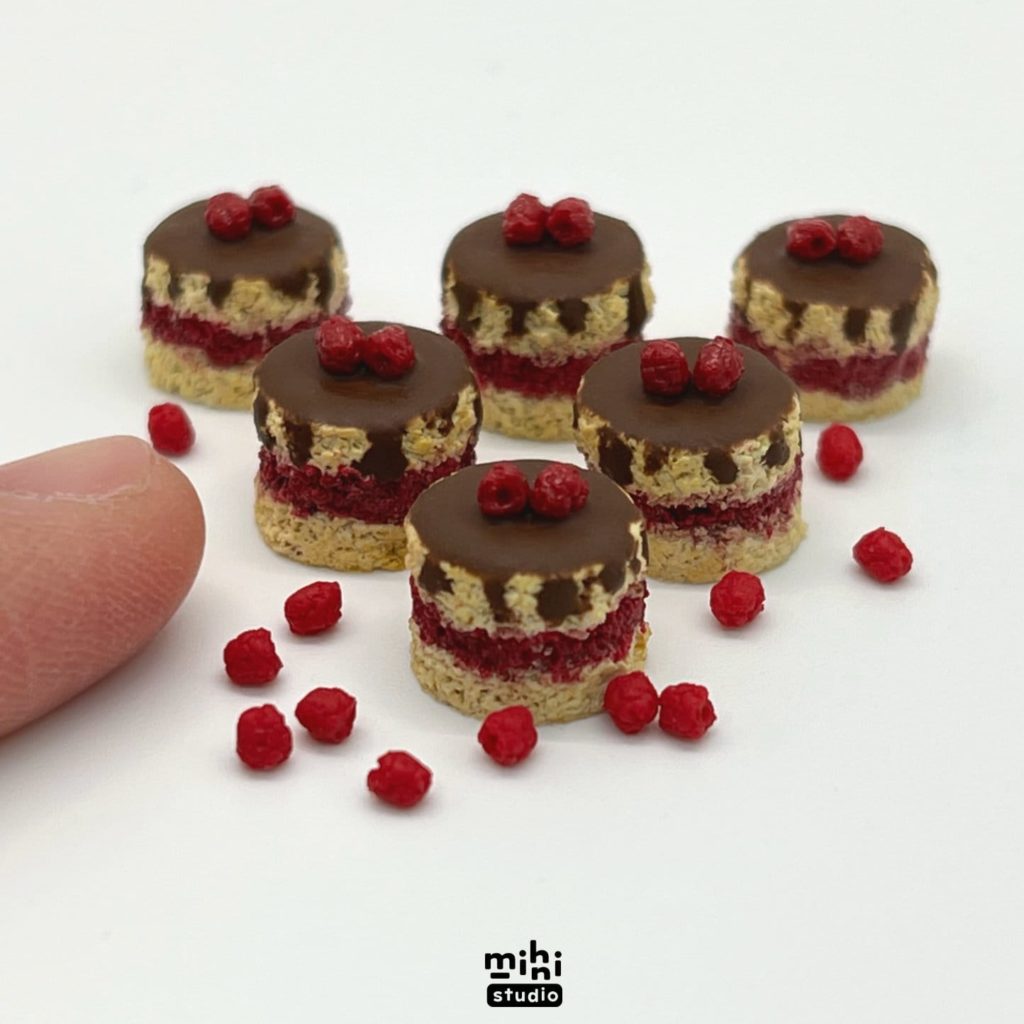
Sometimes I need a lot of something, but it’s a very tedious item to make over and over. Take these raspberries shown below, for example. Each raspberry needs tens of little tiny pieces of clay added together in order to make one raspberry. It’s also very easy to accidentally squish the berry as you’re sculpting it. There’s also not a high need for distinct uniqueness between berries. They’re so small that nobody can tell if they are identical to each other or not.
Molds are great for batch production, with one caveat. You must produce enough copies to make multiple molds in the first place. However, using fast-curing mold putty, this doesn’t take very long. I made one raspberry out of modeling clay, made one mold. I then made more berries using the mold in order to make more molds. This way, I was able to make many raspberries at the same time.


Each raspberry has a little hole poked in the top opening of the mold. Some texture is also added prior to baking. Raspberries don’t have a “flat surface,” but it’s quick to add these details during production. This step also lends some uniqueness to every berry.

Versatile Base Molds
Finally, I often want to make different variations of something using the same base components. Rice is a great example of this. Rice is tremendously tedious to make with polymer clay. Rolling out every individual rice grain is very time consuming and not particularly exciting. I made two pretty specific rice-based components: a shaped serving of rice, and nigiri rice for different sushi presentations.
In each case, I made one master and then used mold putty to easily produce additional copies. Check out the gallery below for examples of how these two molds have been used:


The rice serving is versatile as a side dish, in a rice bowl, by itself, and more. I could make white rice, brown rice, fried rice, and more using this mold.


The nigiri sushi rice is perfect for producing consistently sized and shaped sets. The additional components add variation, so I don’t need to worry about the rice being identical across different pieces. I always bake my polymer clay rice inside the molds. It’s very prone to getting mushed if removal is attempted with raw clay.
Thank You!
As always, thank you for reading! I hope this short article was helpful to you in your polymer clay miniatures journey. You can read more tutorials and making-of articles in my blog. And I’m sure you can think of other applications for miniature molds.
If you’d like to follow along with what I’m working on, you can explore my Instagram at @mihi.mini.studio. To be notified of new tutorials, guides, sales, and more, subscribe to the newsletter.
Happy crafting!