This is Part 2 of a series of blog posts on how you can learn how to make resin artisan keycaps. In this post, I’ll sculpt a new artisan keycap master. I’ll discuss the design and technical considerations, as well as go over tools and equipment. In part 3, I’ll create a silicone mold of the master sculpt to get ready to cast resin. In part 4, I’ll make single shot and multi-shot resin casts.
Important: Read Part 1 First
Please make sure you’ve read How to Make Resin Artisan Keycaps – Part 1: Getting Started and Minimum Equipment before proceeding. To learn how to make a keycap mold, read How to Make Resin Artisan Keycaps – Part 3: Making a Keycap Mold.
What I’ll Be Making
In this series, I’ll document how I made an artisan keycap I call Renewal. Renewal is a nest containing three eggs and a little beetle on a tree / bark base. When completed, Renewal looks like this:


Let’s get started!
What is a Keycap Master?
Firstly, what exactly are we making?
A keycap master is a little sculpture that is not a working keycap. Instead, it’s just the “visible” part of the keycap. The master is then used to create silicone molds. Resin is casted into the silicone molds to make copies of the master sculpt that become functional keycaps for mechanical keyboards.
Masters can be sculpted by hand, or designed with computer software and 3D printed on SLA printers. In this blog post series, I’ll sculpt a master out of clay.

Sculpting Tools and Materials
In order to make a keycap master, there are a few things that you’ll need.
Please refer to the Basic Sculpting Supplies section of the Getting Started and Minimum Equipment blog post for an overview.

Sculpting Clay
I like to use sculpting grade polymer clay to make keycap masters. I love using Super Sculpey Firm: it’s easy to condition and holds fine details very well. It doesn’t require heat to soften, and doesn’t dry out in the air. I like polymer clays because they can be baked to cure / harden, and the baking can be done in stages to preserve finished details when adding additional layers. I’ll demonstrate this several times during this sculpt.
Super Sculpey is also easier to come by (and less expensive) than Monster Clay, which is another popular option. They have different properties and different benefits, and are therefore more or less suited to particular types of sculpts. For Renewal, Super Sculpey is the obvious choice due to layering requirements.
Sculpting Base
A sculpting base is an essential tool for making keycap masters. You really shouldn’t attempt to make keycap masters without one. Why?
If you look at the photo above, the purple aluminum sculpting base has a few key features:
- Inset with a registration corner to create a two-part mold
- Elevated platform representing the size and depth of a keycap stem cavity
- Elevated platform indicating keyboard clearance safety zone
I like to use the Z-butt mold system for creating keycaps, so I use the Z-butt aluminum sculpting base. I have a bunch of these (one can never have too many!). If you’re using polymer clay and plan to bake your master to cure it, you’ll need the base to be heatproof. If you’re using Monster clay, or won’t be baking your master, you can use a 3D printed plastic or resin base instead.
Sculpting Tools
You can get by with a bare minimum of tools if you’re still working on your sculptor’s collection, but there are a few tools that I always default to when making keycap masters:
- Small ball tool
- Needle tool
- Pointed silicone tool
- Exacto knife / razor blades
- Dental pick
- 99% isopropyl alcohol
- Lint-free swabs or makeup applicators
I use isopropyl alcohol and lint-free swabs to clean fingerprints and dust off my clay. (If your swabs aren’t lint-free, you’ll likely end up leaving fibers on the clay in lieu of fingerprints.)
Sculpting for Good Clearance
I started Renewal (and indeed, I start all my keycap masters like this) by conditioning my clay, and then covering the sculpting base. I used my fingers to shape the clay until it was even and had complete coverage over the little platform in the middle of the base. Then I used an exacto knife to trim off excess clay to make sure I did not overhang the shorter raised platform, as shown in the image below:

To ensure perfect clearance on a standard keyboard next to other standard-sized keycaps, no part of the sculpt should protrude past the raised platform edge on the sculpting base.
That being said, there is a little bit of wiggle room, and the wiggle room increases as you get higher up on the sculpt. Most keyboard keys do not have sides that are 90°, but instead slope slightly inward toward the top. However, keep in mind that keys travel vertically — so even if you’ve got clearance between keys when they’re at rest, what happens when you press one? Will features you’ve added to the top that overhang the edges end up hitting neighboring keys, or the keyboard case? These are all things to keep in mind when sculpting keycap masters.
Sculpting Elements
Some of my artisan keycap designs are one single feature, and others are multiple elements composed together. Renewal contains multiple distinct elements: tree / bark base, nest, each egg, and the beetle.
I started by sculpting the nest. I shaped a ball of clay, fitted it on a large ball tool, then used a dental pick and exacto knife to sculpt the individual branches and sticks that form the nest. I then added additional texture to the sticks lightly using the pick held at an angle.
As I worked, I compared the nest size with the rudimentary clay base on the sculpting platform to ensure there wouldn’t be clearance concerns once the components were united.


Once I was happy with the nest, I baked it for 15 minutes at 275° F to cure the clay. This meant that I could press it into the clay base and also add the eggs without any fear of squishing or marring the finished nest.
Design Considerations for Making Molds and Casting Resin
Next I made the three eggs. The eggs were then placed in the nest and attached to the bottom with additional clay. And this is a great time to talk about the mandatory design considerations when your intent is to make a mold of a piece, and to make castings.


Whenever you make an artisan keycap master, keep your end product in mind. I made note of these concerns in my blog post about making polymer clay keycaps: when you’re planning to make casts of a sculpt, you need to remember the mold-making and casting steps, and understand their technical limitations. Using specific types of materials can help ease issues, but it’s still important to remember how molds and casting work. These things should be kept in mind from the very beginning, when you’re designing your keycap. That’s why we’re talking about it now, during the sculpt phase, instead of waiting to talk about it during the mold-making and resin-casting blog posts later.
I knew all along that the mold and resin casting steps for Renewal would be tricky, or potentially prone to a higher than average casting failure rate. I took extra care during the design and master sculpting process to minimize issues while still maintaining as much fidelity as I could.
Mold Considerations
When creating a silicone mold, all components must be attached to each other — with a way to exit the mold as a single, uniform piece. Keycap molds are two part molds, but the second part is the stem cavity. So for all intents and purposes, the artisan part of your artisan keycap is a one-part mold.
I haven’t reached the point where I’ve been tempted to make a three part keycap mold yet, but the day may come (and if it does, I’ll be sure to share my success — or failure — story with you all!).
Here are some important things to consider for making a mold of your keycap master:
- Complex nooks and crannies in the master can create weak points (or even failure points) in a mold
- Horizontally protruding elements make de-molding challenging, and can result in damaged molds or casts if your mold rubber is harder
- When something vertical tapers inward and then flares outward, the wider part has trouble fitting past the narrower section during de-molding; this puts stress on and stretches the mold during de-molding, and reduces lifespan and durability of your mold
Renewal and Octopus are currently my two most challenging molds (at the time of this writing, though I’m sure I’ll make more in the future).
Multi-Shot Resin Casting Considerations
On top of the considerations for mold-making, there are resin-casting considerations as well; and if you’re planning to cast resin in multiple shots (e.g., different colored resin in separate casting sessions in the same mold), there are even more considerations. You’ll need to compose your master sculpt in a way that is conducive to each resin shot staying within its own area long enough to cure, without spilling or leaking into other areas of the mold.
Some considerations to keep in mind when doing multiple shots are:
- Angle of the “well” for resin capture: resin is liquid, and all of my favorite resins are low viscosity (watery vs. thick); if the area for resin to fill is at too steep of an angle, the resin will spill out before it can cure, resulting in unwanted resin in other sections of your mold
- Size of access area for depositing resin: if you have a nice large area for resin to fill but the opening to access it is too small, you’ll have a very hard time depositing resin into that section without trapping bubbles or making a mess of your mold
- Size of “well” for the resin: if the area meant to contain resin is too small, it’ll be very challenging to get a drop of resin off the tip of a pin and into the mold without overspill, or without your tiny drop flying off to stick to the mold elsewhere (do not underestimate static electricity’s effect on silicone and resin!)
- Turning corners: if your feature of a certain color wraps around multiple sides of the keycap (e.g., cannot be completed in one shot / angle of the mold), then you’ll need to be able to independently color match multiple shots to complete one colored feature — which can be a pain with complex color shades (so stick to unmixed colors for this)
- Fiddly bits of silicone in the casting area: if you have protruding complexity in the mold within an area you’re doing a resin shot in, the chance of trapping air bubbles, causing imperfections, or ripping / damaging the mold during de-molding is higher
Renewal Design for Molds and Resin Casting
As I mentioned earlier, the Renewal sculpt presents some challenges for molds and resin casting. The challenges can essentially all be seen at this stage, with the nest and the eggs. There are a few things that had to be carefully considered, and trade-offs were made.
Firstly, the eggs: if there had been just one egg, this would be a non-issue. The egg would simply lie in the nest as one distinct component, and there’d be an access point for resin and for de-molding where the egg touches the bottom of the nest. However, with three eggs clustered together, silicone (during mold creation) or resin (during casting) must navigate the cracks and gaps between the eggs and between the nest, and then it must all come out of the mold vertically in one single piece — without tearing the mold.
The eggs were very carefully placed so they are touching, but not creating too much negative space between them. A small amount of clay was added underneath to both hold the eggs in place, but also to provide a tiny bit of filler in the spaces that would otherwise trap silicone and cause mold failure. The trade-off is that a little bit of detail and fidelity is lost. And with the eggs not being distinctly standalone from each other (honestly, that would look ridiculous), casting multi-shot resin in them is more prone to leaking or contaminating minuscule other areas of the nest.
The other challenge had to do with the shape of the nest itself, and how it would ultimately be attached to the keycap base. This could have been avoided by giving the nest a completely flat bottom and no taper (so that it was a cylinder rather than a bowl shape), but I wanted to push it for a higher degree of realism. The nest is also highly detailed and has a lot of intricate areas where bubbles could potentially be trapped, or the mold could potentially rip. As a result, it takes mold release, care, and patience to extract the keycap from the mold; getting the bowl of the nest out through its narrower connection surface area with the base puts stress on the mold and can be prone to tearing.
Composing Elements
Once the eggs were attached to the cured nest, I baked the nest feature again so I could attach it to the base without squishing anything accidentally. Polymer clay can be baked over and over to no ill effect, as long as the temperature stays within the recommendation.
I then textured the base to look like tree bark using my dental pick, needle tool, silicone tool, and tin foil. Once the base was finished, I pressed the cured nest into the raw clay.


The last element was the beetle. I sculpted the beetle carefully and then baked him so he wouldn’t get crushed when I added him to the base.
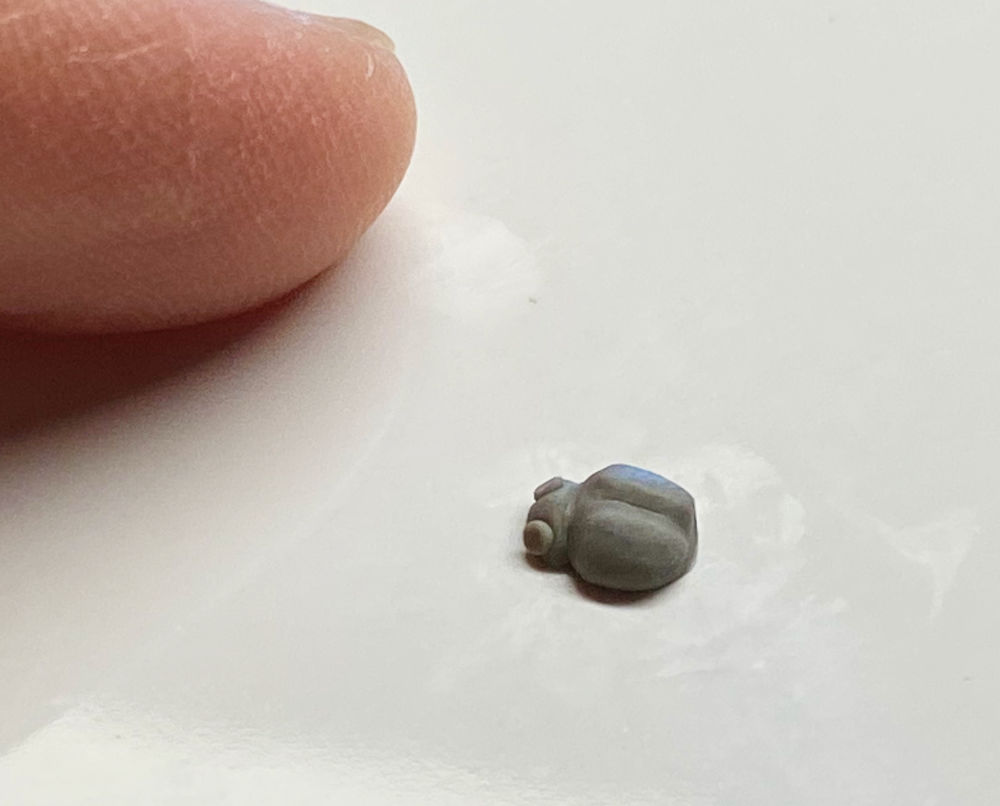

The cured beetle was then added to the raw clay base. I placed him near the top edge so that he would be easily visible when the key was on a keyboard (elements too low down are obscured by other keys). He’s at a very slight angle, but I made sure to keep the resin multi-shot considerations in mind, so that the resulting keycap mold could be set on its side, and he could be filled with resin without leaks or spillage.
I then baked the entire keycap master. It’s important to note that after this final cure, I examined the sculpt very carefully for any potential failure points. At this stage, I noticed that the nest had set with too much of a gap between the base, which would allow silicone to seep into cracks where I did not want empty spaces in my finished resin keycaps. I used some very small bits of clay to fix this, and also to fill in any last negligible gaps between the eggs that could potentially cause problems later.
Glazing the Keycap Master: Texture Matters
The texture of your keycap master determines the texture of your resulting resin casts after you’ve made a mold. Polymer clay naturally cures to a matte texture. This is ideal for the nest and the bark, but I want the eggs and the beetle to produce a sleeker result in resin.
I varnished the eggs and the beetle with satin glaze. This ensures that any resin casting will have a smooth, glossy texture (and produce much shinier results). The trade-off is that it makes it harder to paint, as primer does not like to stick to smooth, glossy surfaces.

In the future, I may make two more molds: one with the master re-varnished with matte glaze (for making casts that can be primed and painted), and one with the master completely re-varnished in satin glaze (for making all-shiny casts). Of course, applying glazes to the finished resin casting also has this effect, but it’s nice when it’s part of the mold texture.
Finished Keycap Master Sculpt
And that’s it! At this point, the master sculpt for Renewal was done.

Additional trials waited ahead: making the silicone mold, finding out just how challenging the mold was going to be to work with, casting resin in the mold, painting single shots, casting multiple shots, thinking up new colorways, and more.
Please continue to follow along to keep learning how to make resin artisan keycaps — and if you’re interested in finding out more about when Renewal might be up for raffle sale, please follow me on Instagram where I make all my sale announcements!
Now Make a Silicone Keycap Mold
If you’re ready for the next step of the keycap-making process, read How to Make Resin Artisan Keycaps – Part 3: Making a Keycap Mold.
I make artisan keycaps, miniature foods, charms and jewelry, dioramas, digital art, and sell things in my shop. I also write blog articles describing my process and showing tutorials, and announce new products, limited raffle sales, giveaways, and more on Bluesky, Instagram, and in my email newsletter.
If you have questions about the tutorials or inquiries about art pieces that might be available for sale, you can mention me on Blueksy or send me an email. (Please do not DM me on Instagram, as I no longer check DMs there.)