
Quoth is a new resin artisan handpainted keycap by Mihi Mini Studio. This sculpt features a raven skull, feather, and two leaves on a rocky platform. The name is derived from The Raven, by Edgar Allan Poe:
Then this ebony bird beguiling my sad fancy into smiling,
The Raven, by Edgar Allan Poe
By the grave and stern decorum of the countenance it wore,
“Though thy crest be shorn and shaven, thou,” I said, “art sure no craven,
Ghastly grim and ancient Raven wandering from the Nightly shore—
Tell me what thy lordly name is on the Night’s Plutonian shore!”
Quoth the Raven “Nevermore.”
I chose the name “Quoth” because “Nevermore” felt overplayed and uninspired. You can check out this short video of the launch colorways for Quoth below:
Launch Colorways
Quoth launches in the following epoxy resin castings / colorways:
- Cold cast silver (burnished with 0000 steel wool, black polish, satin varnish)
- Cold cast bronze (burnished with 0000 steel wool, black polish, satin varnish)
- Handpainted (Vallejo, Citadel, Army Painter model paints and washes, satin and matte varnishes)
- Deep Onyx (resin colored with translucent black alcohol ink with colorshift charcoal mica)
How I Make Handpainted Keycap Quoth
Quoth is available primarily as a handpainted keycap in detailed, realistic style using high quality model paints and washes. The following is a step-by-step description of how this paint job is achieved.
The whole handpainting process takes 45-90 minutes per keycap after refining my process (depending on if I mess up, how much caffeine and sleep I’ve had, if my hand tremor is particularly bad, how often I get interrupted, etc., etc.).
Resin Casting
Of course, step zero (which is not shown) is to cast Quoth in resin. I use colorants in the casting because clear resin is difficult to prime and paint; using mica powder colorant helps the primer “stick” to the resin surface much better.
I add charcoal black colorshift mica powder and translucent black alcohol ink to my mixed resin before pouring. I call this color combination “Deep Onyx” because it’s a mix I initially created to use for regular casts (that won’t be painted), producing a really nice colorshifting black with additional depth, especially when polished. I could probably use cheaper (non-colorshift) black mica powder and skip the alcohol ink for painting in the future, but I don’t always know if a cast will end up painted or not, so I’ve been sticking with Deep Onyx for now.
To cast Quoth, I mix SmoothCast 325 liquid plastic epoxy resin, stir in my Deep Onyx colorant, pour the resin in the mold, and pop it in the pressure pot at roughly 45 PSI for thirty minutes. After demolding, I let the resin continue to cure for a minimum of a few hours or as long as overnight (or several days if I’m busy and not planning to paint right away).
This yields a casting with a nice powder finish that has a bit of texture to it: perfect for priming and painting. Before priming, I sand the casting and then wash it thoroughly with soap, water, and an old toothbrush to remove resin dust.
Priming
I always, always prime.
Okay, that’s a lie, I have forgotten to prime before, and the result of not priming is always that I need to wash the paint off the resin cast with isopropyl alcohol, soap, and water, and then prime and start over again. This is a pretty time-consuming, frustrating, and costly mistake to make, so I’m committed to not making it anymore. And if I make this mistake again, it’s a good early sign that I should put down the paintbrushes immediately because my head is not in a focused enough space to achieve good mini painting results. 😛
Sometimes I use Vallejo black surface primer and paint it on with a brush, and sometimes I use Army Painter gray in an aerosol can if the weather is clement and I have batchwork to do (but can’t do this if it’s humid or cold outside).

Physical and Mental State Greatly Affect Mini Painting Skills
It’s really, really important to note that a person’s physical and mental state has a huge impact on mini painting skills. Painting miniatures requires utmost focus and concentration, extremely steady hands, very intricate fine motor skills, and acute attention to detail. How you hold your hands is important. Where you brace your elbows is important. Your posture is important. Every little thing in your environment becomes important — especially because high quality acrylic model paints dry very, very quickly. Make a mistake, cake the paint on too thickly, skip priming and find your paint peeling off, and you’ll be suffering for it. A lot.
Never underestimate the impact of lack of sleep, a wandering mind, tired eyes, etc. (Personally, I also have Multiple Sclerosis — and as a result, I have an intermittent tremor in my left hand which is greatly exacerbated by exhaustion, hunger, thirst, pretty much anything negatively impacting my physical state of being). It’s been a struggle for me to train myself to take a step back and put my paints and brushes away for the day when I find myself starting to make mistakes, or experiencing a tremor. As much as I may want to paint, if I’m physically not at the top of my game, the experience and results will end up painstaking, frustrating, or even disastrously unsalvageable.
As a result, I always try to paint in the mornings on weekends, if possible. (Or in the mornings over a holiday break, as I am now.) Or in a worst-case scenario, right after finishing work (before dinner, when I’m still very alert and haven’t switched my brain off to wind down for the day).
You may notice my mug of calming, herbal tea in the materials photo above: this is an essential for mini painting for me!
Painting Base Layers
Order of layers is important in any mini painting endeavor. For Quoth, after priming, I lay down the color of the base / platform that the other components are “resting” on. This is my own mix of gunmetal gray, stonewall gray, and sometimes black and white. I use little plastic paint pots instead of a palette so I can mix colors and save them to use again later (and so I can close the lids of the paint pots to prevent my paints from drying out while I’m still painting).
I’m not particularly careful painting the platform because I don’t need to be. Everything else will be painted in subsequent layers and the base is a neutral, dark color, so I can get the paint all over at this stage and it doesn’t really matter.
Raven Skull
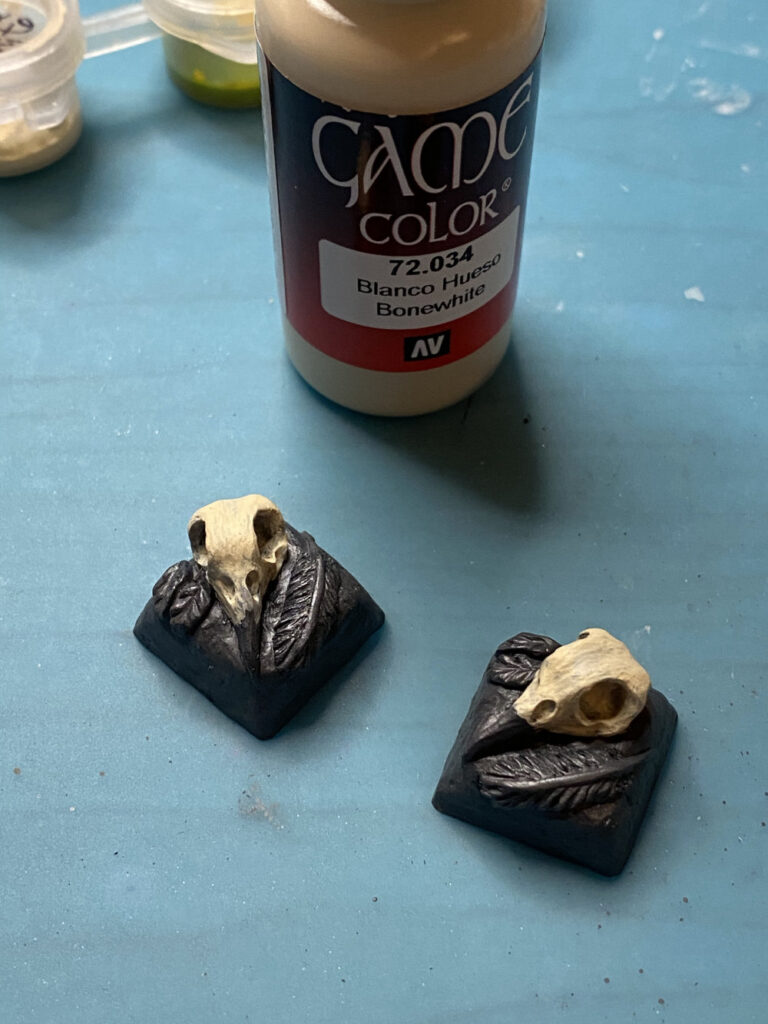
After the base, I paint the skull Bonewhite, which is a great hue from Vallejo’s Game Color line. I don’t paint too thickly because I want to make sure the minute hills and valleys of the sculpt itself are very apparent. This ensures the contours remain organic. It’s okay if hints of the color below show through; in fact, I rather think it enhances the textural effect.
From here on, I am pretty darn careful not to get paint on the platform, because I just don’t want to deal with fixing mistakes. If I make a tiny error, if I’m fast enough, I can dab another detail brush in water, wipe the paint off, and then dry the brush and use it to wipe away the excess water. Delay a few seconds too long though, and the paint will dry, necessitating a color switch to use more platform color to cover up the error!
I use two different size brushes on the skull, depending on how close to the platform I am. Proximity to other elements dictates if I’m using a 0 or a 5/0 detail brush.
Leaves
Next I paint the base colors for the two leaves. One leaf is lying just very, very slightly overlapping the other, so I paint the underlying leaf first. This one’s brown, and I use an existing shade to make my life easier. I use a 5/0 detail brush on the whole leaf, because it’s very tiny anyway, and I need to be extremely precise in order to paint the edges of the leaf next to the platform.

I then repeat the process with the second leaf that overlaps. I have a “leaf mix” of colors that I keep around, which is my own blend of green, yellow, and brown. Extra care is taken here to avoid getting paint on the platform or the first leaf.

Beak and Feather
I want the raven skull’s beak and feather to be a glossy black color, so I carefully paint both of those black. This results in a fairly hard, jagged edge between the black beak and the rest of the white skull. I then dry brush with both black and white alternately (and as needed) to soften and blend this edge organically.

At this stage, the base colors are done! Nothing is shaded though, so that’s next.
Shading With Washes
Just the thought of painting individual shadows on these keycaps with liners makes me want to die, so I always use washes for shadows and depth. Washes are the consistency of water and are pigmented and contain flow improver so they flow over the surface of a model into valleys and crevices to add depth and shading.
Note: Washes also add tint to the model’s color if used on surfaces, so be aware of that when using various techniques to apply wash.
I use green tone wash and carefully apply it only to the green leaf using a detail brush.

I then do the same using a mid brown tone wash and apply this to shade the brown leaf.

The skull is next. The skull itself is white, so I use a light tone wash and I don’t cover the whole surface with it, because I want to avoid adding too much tint to the skull overall. I brush on the light wash only in the areas that I want to add shadows to.

Finally, I use nuln oil (a dark tone wash) to shade the feather, beak, base platform, and eye sockets.

Varnishing Handpainted Keycaps For Protection and Effects
Varnishing is very important, especially for handpainted keycaps which are handled and will be subject to pressure, friction, finger oils, etc. Some people are afraid to purchase painted keycaps because they think the paint will wear off.
If properly varnished, handpainted keycaps will last a long time. I use satin glaze and apply it to the entire keycap surface. This provides protection, but also results in a semi-glossy finish — which isn’t ideal for things like weathered bone, dry leaves, or stone.
After the satin glaze, I come back with matte varnish and lightly and selectively use it to take down the glossiness of some elements. I want the beak and feather to maintain their glossiness, so I varnish the leaves, platform, and top of the skull.

And we’re done! All in all, I very much enjoy mini painting, but it does take a lot of time and effort, and is highly dependent on my own personal mental and physical state to execute well.
How To Buy Handpainted Keycap Quoth
I hope this blog post was helpful in demonstrating the painting part of the Quoth resin handpainted keycaps, and that folks are interested in having some of these for themselves! Due to the level of time, materials, and effort involved in their creation, Quoth will only be available in very limited quantities. The initial raffle for Quoth is over, though limited casts may be available in the shop, via custom order, or in future raffles announced on Instagram.